The token that promises nothing and delivers it instantly!™
Token Factory 1.1.0.
The Token Factory is your chance to release a token without a single bit of Solidity (Programming)
knowledge. Benefits of version 1.1.0 include:
Airdropping tokens to people
Selling tokens if you want.
Setting a cash-in price so that people can trade in 1 token for some htmlcoin.
Creating swappable tokens. Whether you want to make multiple tokens with different values or
you just want the latest TF update, your users will have an easy way to swap.
Token Creation (Steps for token creator)
Open the desktop htmlcoin wallet. If you don't have it,
go get it.
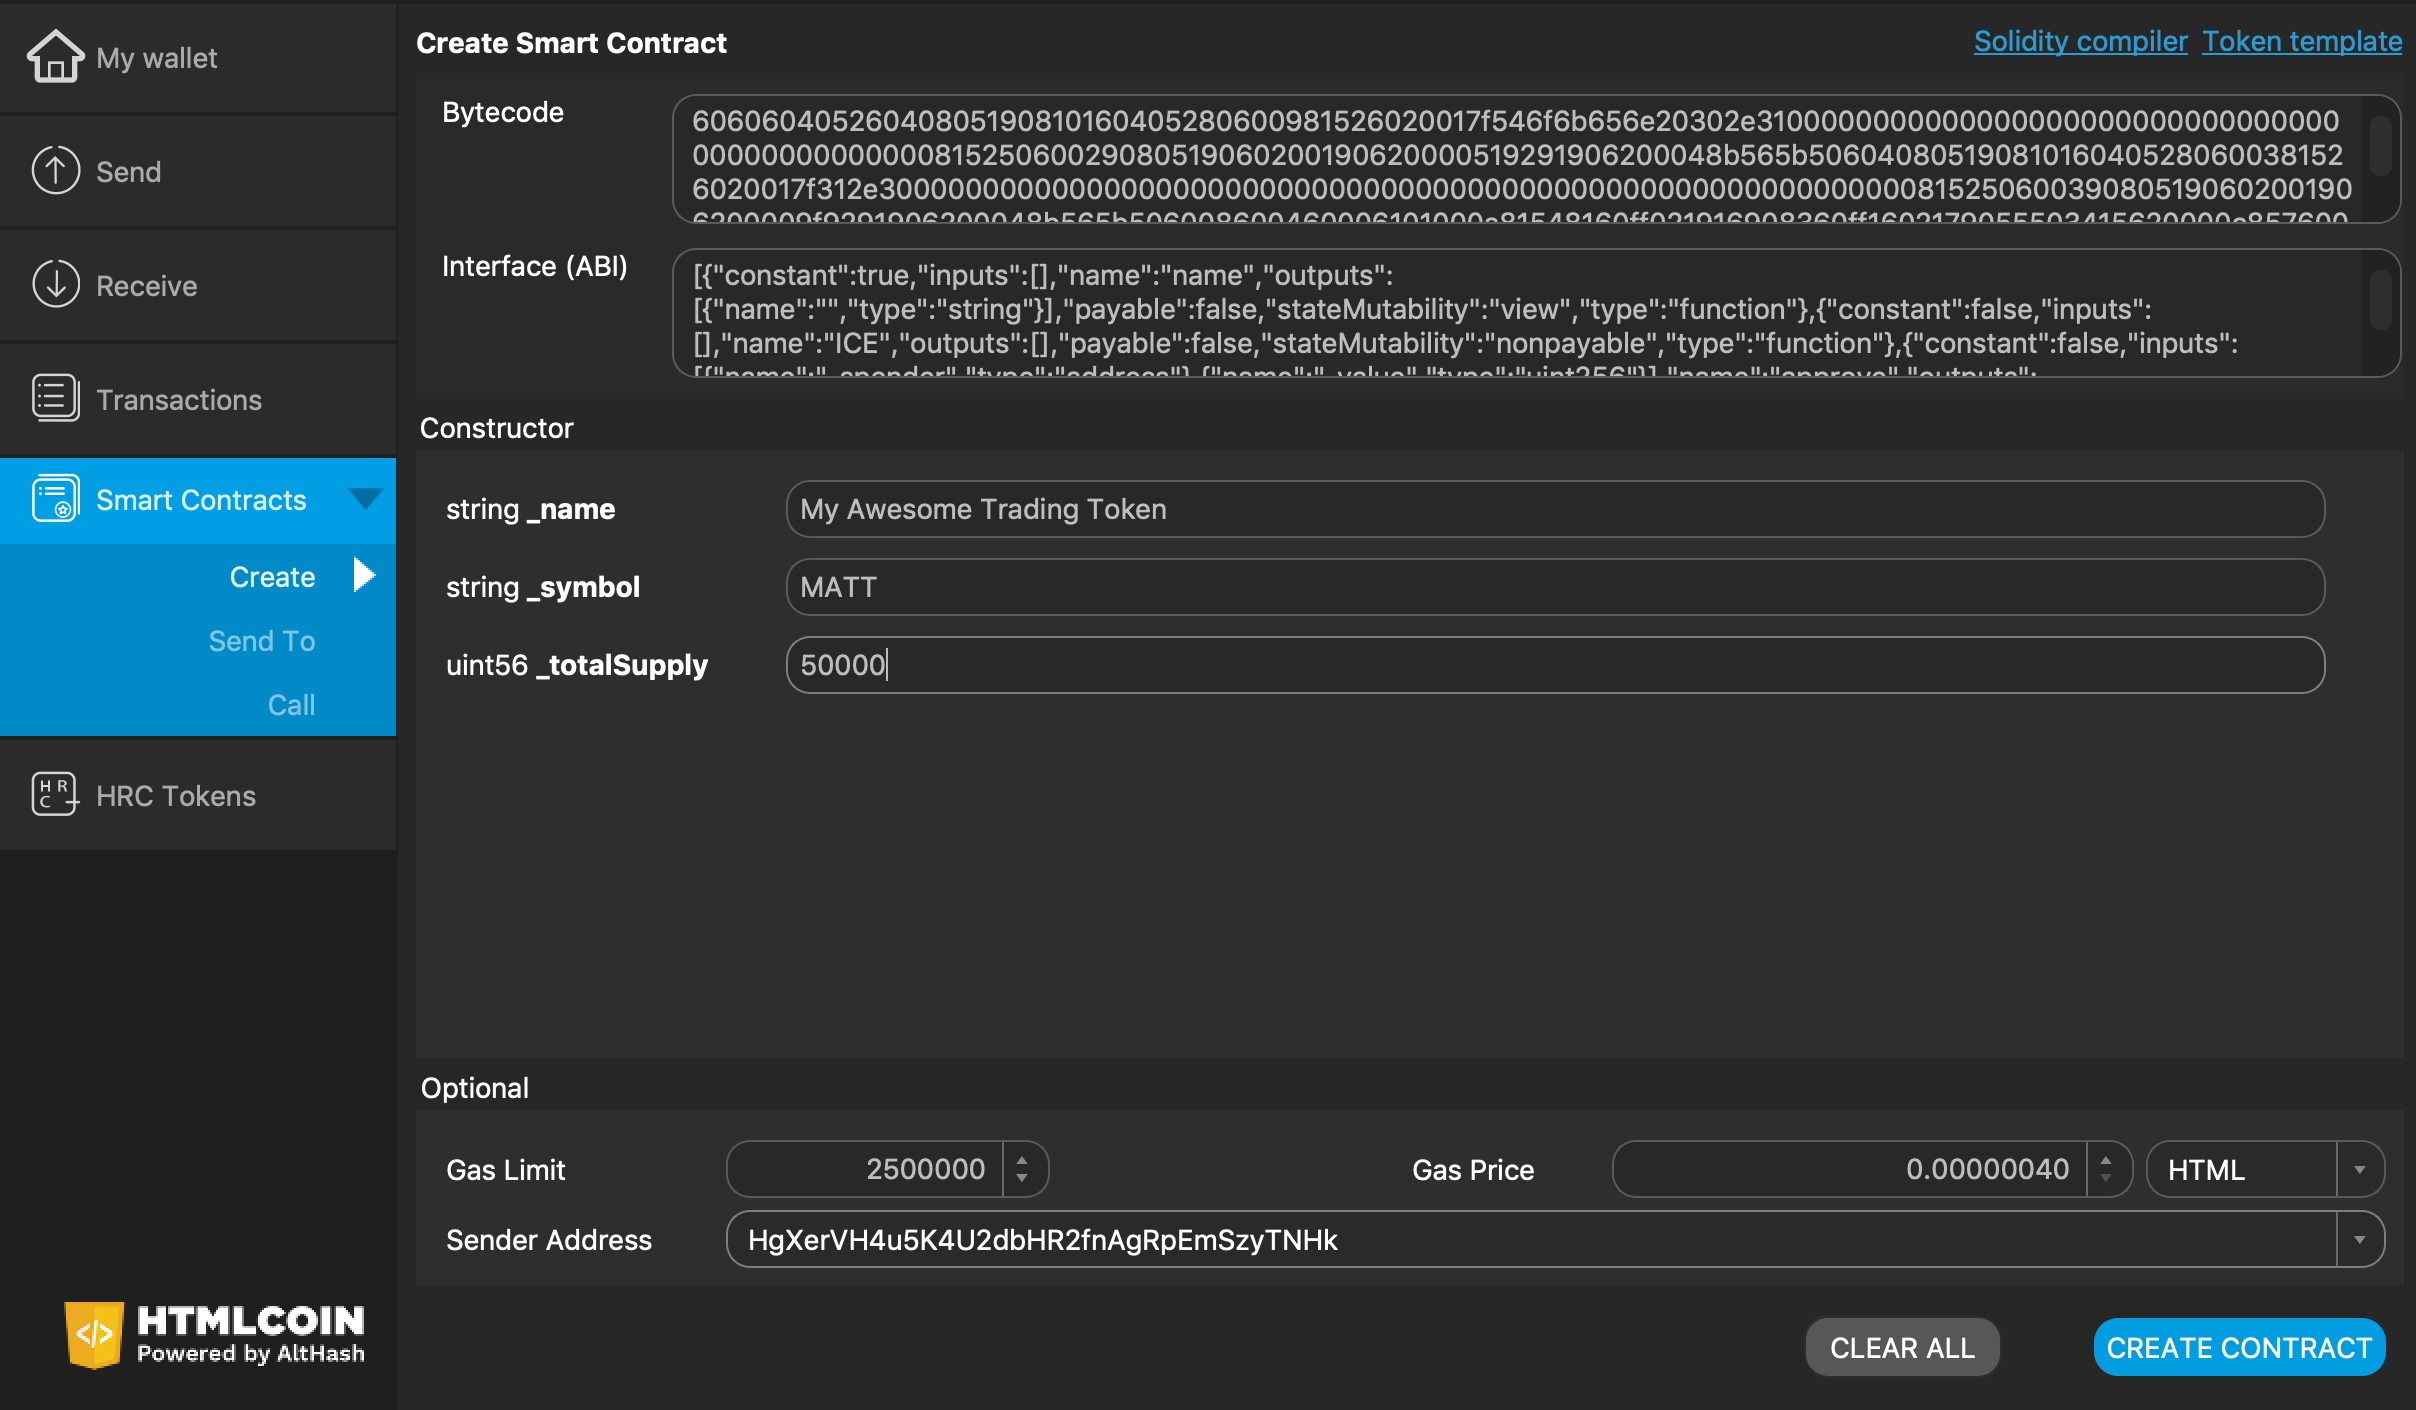
On the left-hand side, click Smart Contracts. Under Smart Contracts, click Create.
– Paste into the Bytecode section.
– Paste into the Interface (ABI) section.
In the string _name field, enter a name for your token.
In the string _symbol field, enter a symbol for your token. Recommendation is to use 3 or 4
alphanumeric characters. I have seen people get away with longer symbols and even use unicode characters,
but I don't know if doing that would have any side effects. Hey, it's your token. You do you. :P
In the uint256 _totalSupply field, enter a total supply.
In the Gas Limit field, change it to 9900000.
In the dropdown for Sender Address, pick an htmlcoin address you want associated with the token. More precisely,
this will be the owner address, so it will be the address that holds all the tokens to start.
Illustration:
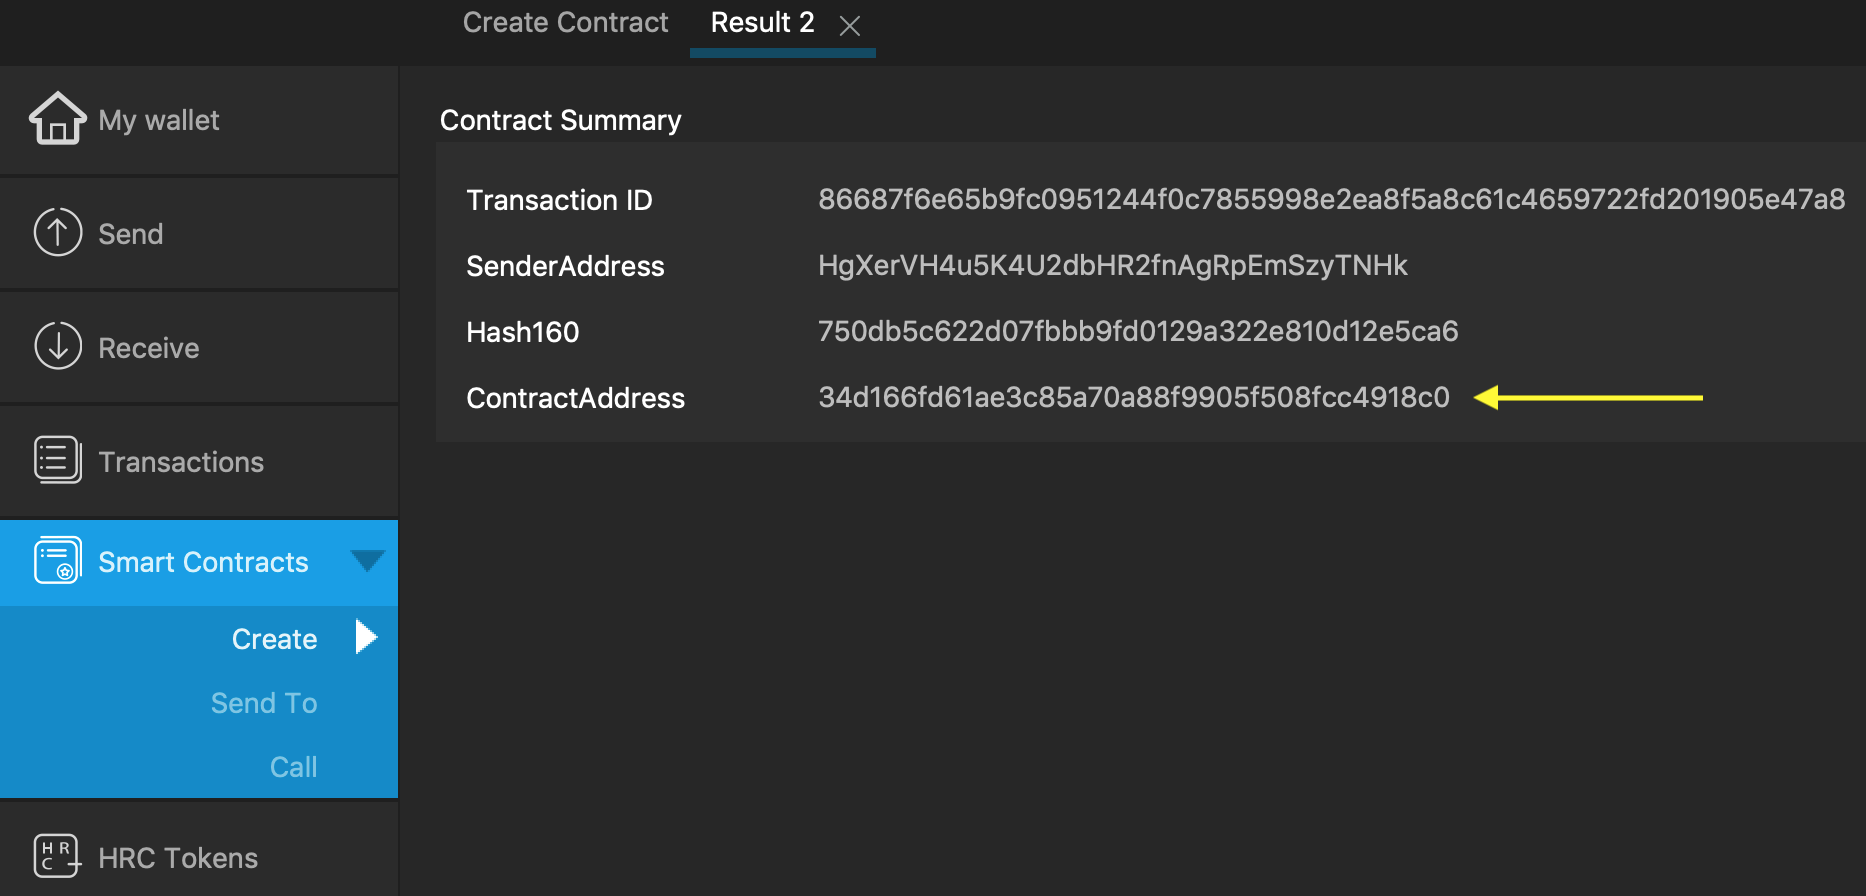
Click Create Contract in the lower-right corner, put in your password (if applicable).
Token created. Grab the Contract Address. You (the owner), as well as any token holders using the desktop wallet,
will need this address.
Adding A Token (Steps for token user and token creator)
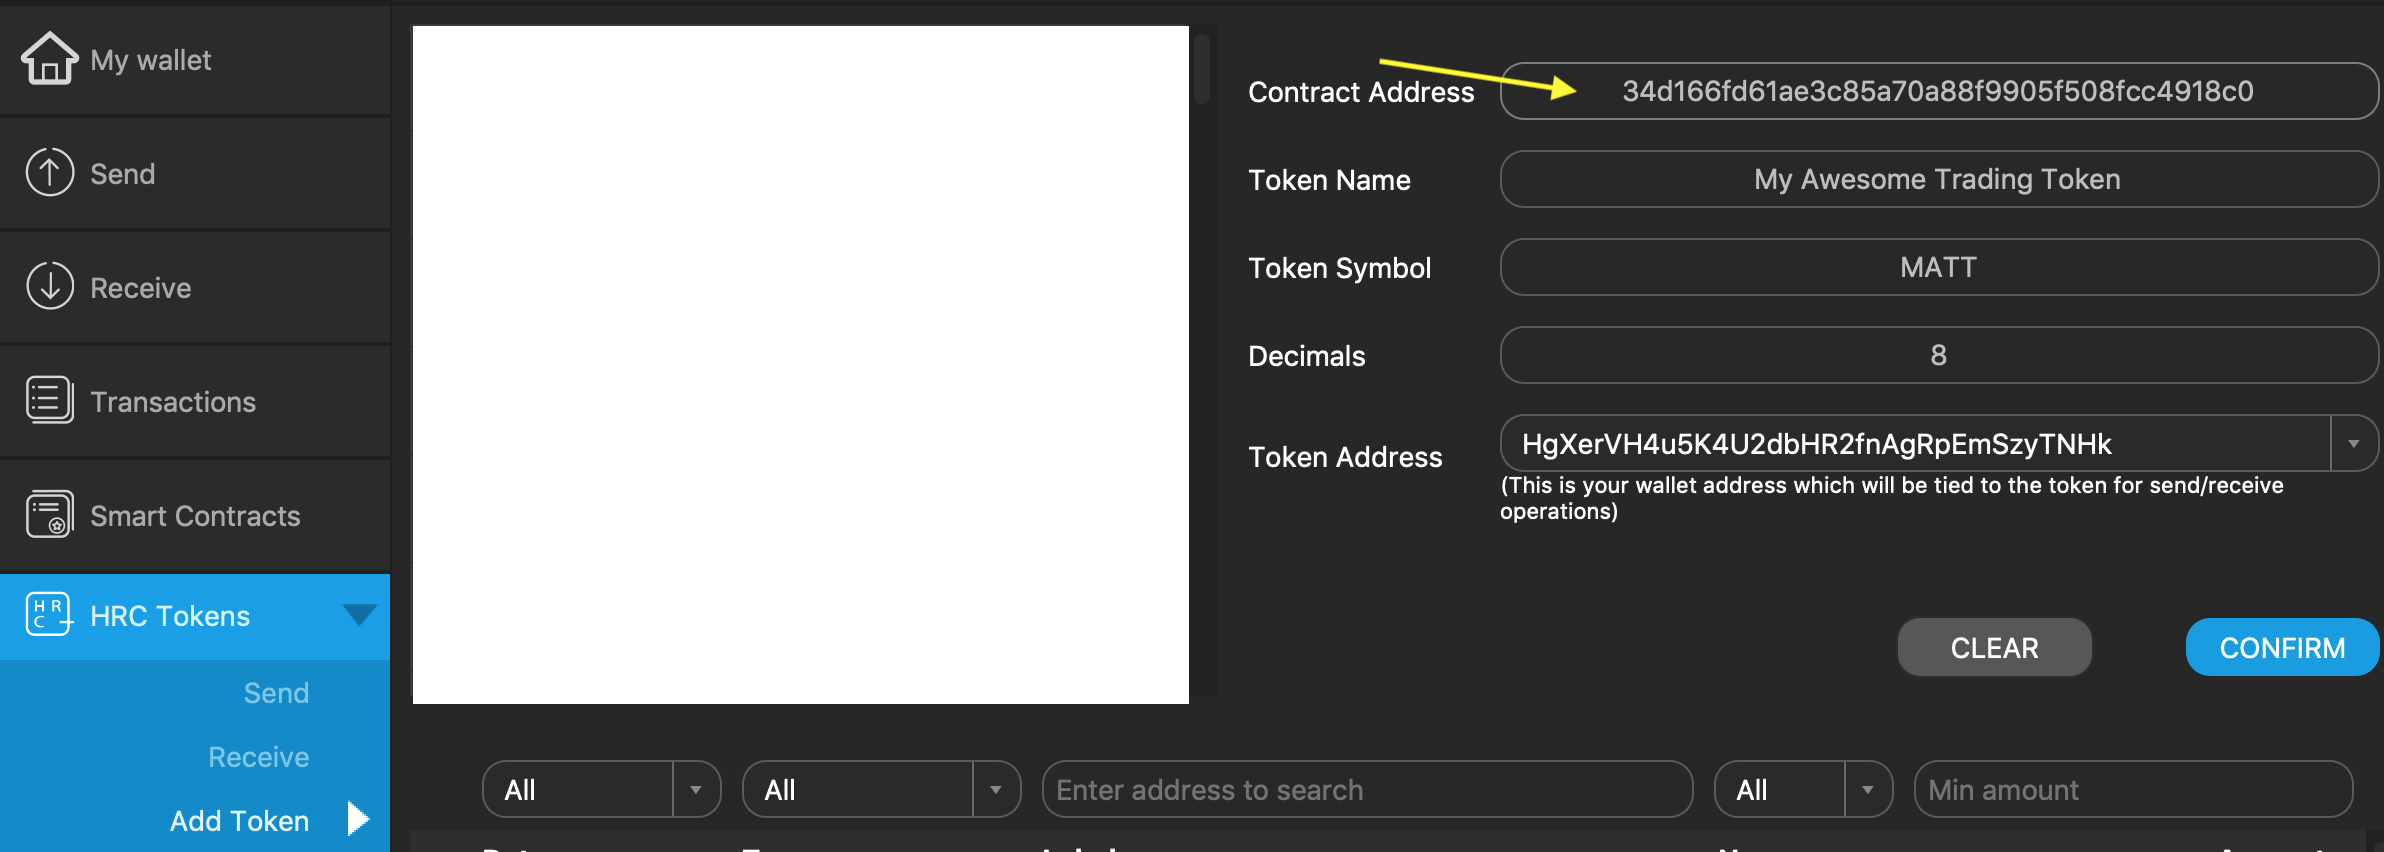
Click on HRC Tokens then click on Add Token.
In the Contract Address field, enter the contract address given to you by the person who created the token.
If you entered the correct contract address, Token Name, Token Symbol, and Decimals will all fill
in automatically.
Choose an address from the Token Address dropdown.
Important: For token creators, be sure to use the same address you used when you created the token. Otherwise,
you won't see or be able to use the total supply you created. If you make a mistake, you can just do
these steps again. It is possible to add the same token over and over with different addresses.
Click Confirm.
Illustration:
Adding The Interface (Steps for token user and token creator)
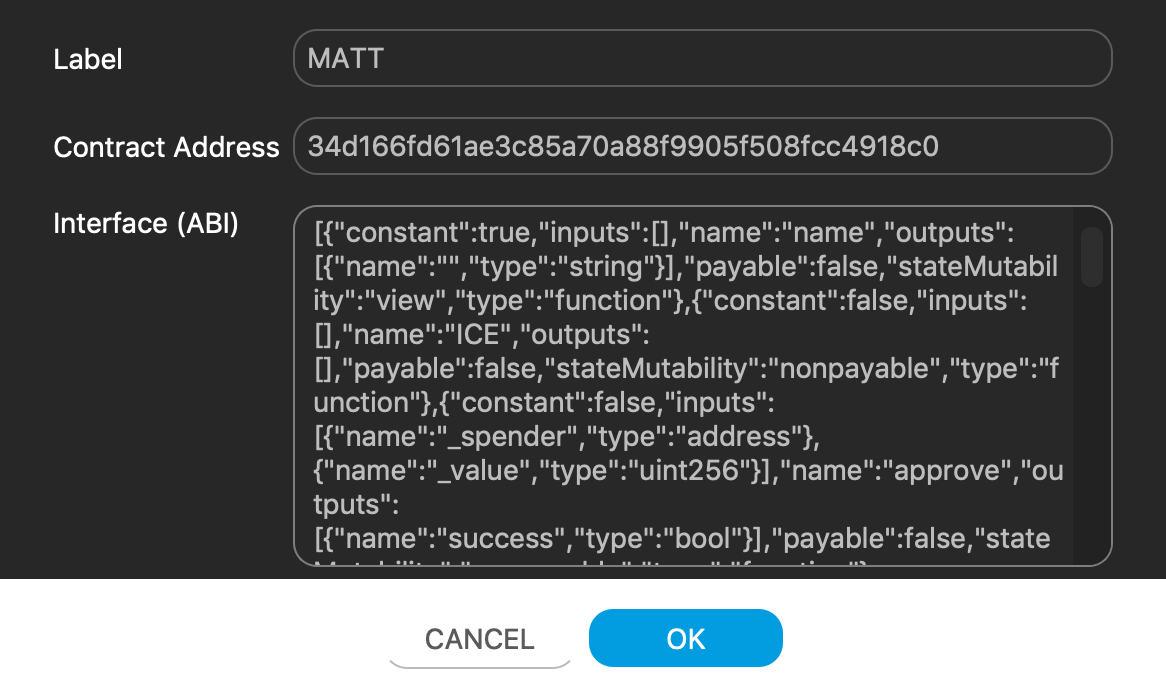
Click on Smart Contracts and then click Call.
Click on the little icon next to the Contract Address field (shown as item 1 in illustration).
Click on the New button (labeled item 2 in illustration).
When the next little window opens, enter the Label (token name or symbol will probably suffice). As long as it helps YOU
know which contract the interace is for. Next, put in the Contract Address of the token. Finally, put in the
Interface (ABI). Do you need that again? Click to copy the ABI
again. Then you can paste it into that big box.
Then you should have something that looks like this:
Click OK and the interface is added.
Call Functions
Call functions are used to get information. They give the user (and sometimes other functions) some useful values. Here's
a list of useful functions or variables to help you. Call functions use NO GAS so have fun abusing them.
Click on Smart Contracts and then click Call.
Click on the little icon next to the Contract Address field.
When the window opens, you'll have a list of interfaces you created and saved. Find the one you made for the
token in question and double click it to open it.
You will see a Function dropdown. Here's a rundown of the useful items...
tokenPrice – This is a public variable. It will tell you the price of tokens
if the owner has decided to sell them. Remember, Althash uses 8 decimal places, so if a token
costs 1 htmlcoin, this value will look like 100000000. No, it doesn't cost 100 million htmlcoin. Just
1.
viewPrices – This is a public function. This spits back a bit more info than just
the token price. You get token_price (same as tokenPrice variable), cash_in_price (if the owner allows you to
cash in single tokens for a little htmlcoin), and available_html_balance. The last value ties into
the cash_in_price. If the contract doesn't have any htmlcoin or enough to cover the cash_in, then you
simply won't be able to cash in any tokens.
TokenFactoryVersion – This is a public variable. As it says, this is the
version of the token generated by the TokenFactory pre-made contract.
getAvailableHtmlBalance – This is a public function. As its name suggests,
this will tell you how many htmlcoins are held by the contract. Yes, this info is supplied by the
viewPrices function as well.
Lots of other functions and variables, but you don't really need to worry about them. Fell free to
check them out if you want. No cost to do so.
Send To Functions
Send To functions are functions that change the state of the contract in some way, whether it's
a simple variable or sending htmlcoin to it. These functions use gas.
Click on Smart Contracts and then click Send To.
Click on the little icon next to the Contract Address field.
When the window opens, you'll have a list of interfaces you created and saved. Find the one you made for the
token in question and double click it to open it.
You will see a Function dropdown. Here's a rundown of the useful items...
ICE – This is a public function, but only responds to the owner of the contract.
ICE, or In Case of Emergency, is an emergency way to remove all htmlcoins from the contract. One thing I learned
early on is, if I didn't have functions to pay out htmlcoins, they just sat in the contract and could essentially
be "lost," as there would be no way to retrieve them. This is not a regularly used function and I've never needed
to use it ever. Still, better safe than sorry.
forceWithdrawEscrow – This is a public function, but only responds to the owner.
Very small fees are collected. This function essentially forces fees to be paid out to all escrows. It's a way to avoid dust.
Fees, as well as this function, don't affect any token holders. The fee is taken from the amount the contract owner
would get from selling the tokens. Also, the owner is part of the escrow system.
setTokenPrice – This is a public function. Only for owner. This function has
9 parameters, so named mainValue and d1 - d8. Use this function to
set the price of tokens. Remember, 1 htmlcoin is realy 100000000, so you'd put 1 in the mainValue
field, and zeroes in all the other fields. You cannot leave them blank. Because you have all these
fields to work with, you can easily set the price to 0.5 html by entering 0 in the mainValue field,
5 in d1, and 0 in all the remaining fields.
setCashInPrice – This is a public function. Only for owner. Set the cash in
value for tokens. Behaves the same as setTokenPrice.
withdrawEscrow – This is a public function, but only responds to escrow addresses.
Essentially, those who collect fees or html from the contract will use this, and can request their own payment at almost anytime
as long as the value is over the threshold (I think it's 50 html). Again, this is to avoid the dust problem.
setFeePercent – This is a public function, but only responds to owner. The owner also collects a fee.
by default, the fee is set to 100%. What this means is, if someone buys tokens from the contract, the owner gets 100% (after
any other fees are collected first). The owner could also choose to take 90%, and let 10% go to the contract to accumulate for
cashing in, but they don't have to.
donateHtmlToContract – This is a public function. As always, anyone can send htmlcoin to the contract
for no reason whatsoever. Maybe they're just feeling generous. Will help with cash-in option.
buyTokens – This is a public function for everyone but the owner. This is how people buy
from the contract. Send htmlcoin with this function call and the contract will send back the appropriate amount of tokens,
based on token price and how much was sent.
setToContract – Owner only. This points FROM an old contract TO a new contract. Enter the new token's
contract address in the old contract.
setFromContract – Owner only. This points TO an old contract FROM a new contract. Enter the old token's
contract address in the new contract.
setNumberOfOldTokensNeededForNewToken – Owner only. Similar to setting token price, set the amount of
old tokens required for a new token. If you enter 1, then 1 old token results in 1 new token. If you enter 2, then 2 old tokens
results in 1 new token. And so on.
For functions that require you to send htmlcoin, put that in the Amount field at the bottom.
When using this field, put in REGULAR values for htmlcoin. If you want to send 1 htmlcoin, just enter 1. Don't
add the extra zeroes here.
If some functions seem to not work for some reason, you can always try increasing the Gas Limit
field from 2500000 to 5500000, or something like that.
When you have made the to and from connections and you're ready to have your
users swap, have them send send old tokens to Hg79qaoKKErhyBnPxF6hyCpGvZVCUNGYXM